Frontend plugins
What is a frontend plugin?
Frontend plugins can be used to add new features, modify existing functionality, or integrate with third-party services. They can be developed by the application's own developers or by third-party developers.
How do plugins work?
A plugin is a piece of code executed upon page load, serving to inject additional functionality into the ordering frontend. Typically, the init-function registers one or more of the following:
- Block component - A component that can be used to inject a custom piece of HTML on a page
- Page component - A component that creates a new page with custom HTML
- Transform component - A component that can be used to modify lists or other types of repeating data, for example to inject a new link in the pop-out navigation
- Event handlers - A plugin can listen to events emitted by the Future Ordering UI, which are triggered by user actions. These events can then be used to perform various actions
What can I do with a plugin?
While plugins have the capability to perform a wide range of functions as they are essentially imported scripts, it is important to follow the guidelines on what plugins should and should not do.
Example of what a plugin can do:
- Display custom HTML on an existing page
- Create a new page and display HTML
- Show a modal dialog when the user logs in
- Navigate to a page
- Receive an event when the user's current order is updated and show information based on that
- Send tracking data to another system
- Use CSS variables from the theme to style custom HTML to blend in with the rest of the Future Ordering UI
- Retrieve an access token for the currently logged-in user to use when calling other APIs
Build your first plugin
Building a plugin is straightforward. Here's an example of a plugin init-function that logs 'Hello world' in the console.
export default async context => {
    console.log('Hello world');
};
Here is an example of a more useful plugin. It registers a block component at the bottom of the start page, displaying a div with the text "Hello world".
export default async context => {
    context.componentLoader.registerBlockComponent({
        location: 'start-bottom',
        loadContent: async ctx => {
            const { shadow } = ctx;

            const container = document.createElement('div');
            container.innerText = 'Hello world';
            shadow.appendChild(container);
        },
    });
};
Plugins can be written in javascript or in typescript and transpiled to javascript. All typescript definitions are provided using the Plugin types NPM package.
Documentation
For more in depth information about the different kinds of plugins and related concepts, please refer to the following links:
- Block component
- Page component
- Transform component
- Plugin events
- Component styling
- User tokens
- Using the Frontend Plugin API to upload new versions of plugins
- Kiosk plugins
- Services
Getting started
Typescript
Using the boilerplate project with typescript is the easiest way to get started developing a plugin.
-
Clone plugin boilerplate project on github.
git clone https://github.com/Future-Ordering/frontend-plugin-boilerplate
cd frontend-plugin-boilerplate -
Follow the instructions provided in the GitHub project on how to install and start the development server.
-
To view the plugin, see Testing out a plugin in the Future Ordering UI below.
-
See examples directory in boilerplate project for inspiration
Javascript
-
Write code in a text editor of your choice. For example, create myplugin/1.0.0/myplugin.js using the following command:
mkdir -p myplugin/1.0.0
touch myplugin/1.0.0/myplugin.js -
Enter the following code:
export default async context => {
    console.log('Hello world');
}; -
Easiest and most convenient way to develop a plugin is to serve it from localhost.
Starts a web server on localhost (files served must have cors enabled)
Using Node.js to serve plugins from current directory
npx serve --cors . -
To run the plugin, see Testing out a plugin in the Future Ordering UI below
Testing out a plugin in the Future Ordering UI
This feature enables loading a plugin from your local computer for testing purposes. Your plugin will not be visible to anyone else.
We recommend using Google Chrome. You may need to enable the flag for allowing insecure localhost in your browser. To do so, navigate to: chrome://flags/#allow-insecure-localhost and restart your browser.
-
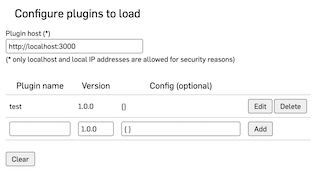
Navigate to {Future Ordering UI}/plugins
- Set plugin host (from examples above, use http://localhost:3000)
- Add plugin, set name, version and optional config (from example above use name "myplugin" and version "1.0.0")
-
Plugin must be served from the following URL format {name}/{version}/{name}.js, for example if the plugin host is "http://localhost:3000", the name is "myplugin", and the version is "1.0.0", then the full url would be http://localhost:3000/myplugin/1.0.0/myplugin.js. Only localhost and local IP address ranges are allowed for security reasons.
-
Press the "Back to site" button. Plugin should now be active
Note: see "bundling" below for important information about how to bundle your plugin.
Using HTTPS
Some browsers do not permit loading files over HTTP while on a site served over HTTPS. In such instances, a self-signed certificate must be generated and used.
We recommend using a tool called mkcert, which will create and install an HTTPS certificate. After you install mkcert, generate a certificate for HTTPS:
mkcert -install localhost
The certificate is at "./localhost.pem" and the key at "./localhost-key.pem"
When using the boilerplate project, the dev-server can simply be started by running the command:
npm run dev-https
If instead using plain javascript, start serve with the following command:
npx serve --cors --ssl-cert localhost.pem --ssl-key localhost-key.pem .
Please note that the plugin host needs to be changed to use HTTPS instead of HTTP. Set the plugin host to https://localhost:3000. See Testing out a plugin in the Future Ordering UI
Bundling
Each plugin must be bundled to a single file, only a single javascript code file can be uploaded (see publish plugin below). Use format esm when bundling to preserve import/export format.
Plugin manifest
Each plugin must have a manifest file that describes metadata about the plugin. Create a file named manifest.json that should contain the following properties:
version: Example: "1.0.0"description: Description of the plugin.parameters: Description of parameters in the configuration. Each parameter is rendered as inputs to be easily entered when configuring the plugin.
More info about plugin manifest
Upload a plugin
-
Ensure the plugin is bundled into a single javascript file along with the plugin manifest.
-
Navigate to Future Ordering Navigator at https://{tenantId}.navigator.futureordering.com/. (Replace {tenantId} with your actual tenant ID.).
-
Access the "Frontend Plugin Uploader" app.
-
Click on the "Upload Plugin" button, then either drag and drop the files or click to upload them.
Publish plugin
-
Navigate to Future Ordering Navigator at https://{tenantId}.navigator.futureordering.com/. (Replace {tenantId} with your actual tenant ID.).
-
Access the app "Frontend Plugin Configurator".
-
Click on the "Configure plugin" button
-
Enter details
-
Choose the newly uploaded plugin from the dropdown menu.
-
Enter specific plugin configuration, if available (configured in manifest.json).
-
Specify channels if the plugin is only available in specific channels.
-
Specify countries if the plugin is only available in specific countries.
-
Specify consent levels if the plugin requires user approval for certain content levels in the cookie dialog.
-
Specify app tracking if the plugin requires user to allow tracking in the app.
-
Configure allowed data URLs if the plugin loads data from other domains.
-
Plugin guidelines
-
Plugin should only modify the code inside of the plugin. It is NOT recommended to access HTML elements outside of the plugin container. HTML outside of the plugin's scope does not provide any guarantees for staying as is and can change at any time.
-
Plugin should not rely on reading of the URL, cookies, session/local storage. URLs of the Future Ordering UI, cookies, variables in storage can change at any time. Instead, the plugin should use classes and methods provided on the context object to figure out what context the user is in.
-
A plugin should always clean up after itself. This includes stopping intervals, loops, and other code that will continue executing if not stopped.
Browser support
Full plugin functionality requires a modern browser. However, a limited subset of plugin features can also be made to work in older browsers.
For more details, see plugins in old browsers.